

Collection Variables
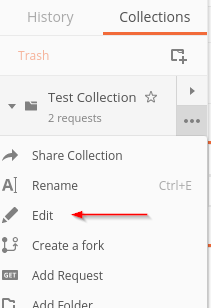
Variables in Postman can be used in almost any field in the request. The syntax is to use double curly-braces on either side of them. There are a few places I can define them. If they’re relatively static, maybe I set them as collection variables. For example, I’ve been using http://localhost:4000 as my test host. If I change the test API’s port from 4000 to 4001, I don’t want to have to edit the URL of each request. Here’s how move that into a Collection variable. First, I open the edit dialog for that collection on the Collections list in the menu side-bar. I can either click the ... button or I can right click the collection name itself. In either case, I get the same context menu, and I want to choose Edit.
This will open a dialog for editing the collection. The default view has the name of the collection and a description textbox, but there’s also a row of tabs between those two fields.
One of those tabs is called Variables. That’s the one we want, and click it will open another dialog, for editing variables.
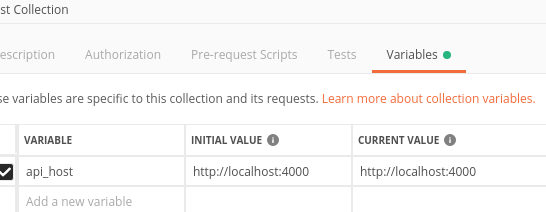
It has a grid containing a Variable column for the variable name, and Initial Value column, and a Current Value column. The differences between those two value columns relate to syncing through Postman’s paid features. What matters here is that you will enter the initial value, and then tab into the current value field. This will automatically populate the current initial value into the current value field, and it will look as pictured. Now I have a collection variable called api_host, with a value of http://localhost:4000. I’m done editing variables, so I click the Update button.
It’s time to modify my requests to reference that variable instead of having their own hard-coded hostname and port.
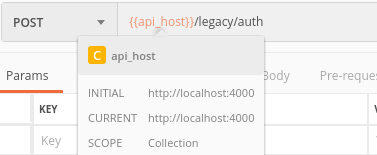
I simply replace the applicable part of each URL with the placeholder:
Hovering over the placeholder will expand it to tell me the value and scope. There’s some color-coding here to help us out too. The text turns orange when it’s valid, but would be red if I put an invalid variable name in.
I still have to update each request this once, to make them use the variable. But in the future, if it changes port, if it switches to HTTPS, or if I deploy my test API to a completely different host; I can just go back into my collection variables and update the values in there, and my requests will all receive the change accordingly.
Now collection variables are fine for relatively static bits that won’t change much, but what if I’m testing multiple environments, deployments, or even multiple tenants in a multi-tenant solution? It’s likely I’ll want to use the same collection of requests but with different sets of variables. Environment Variables deal with that problem.
Environment Variables
You may have already noticed their interface on the top-right of the window. Let’s take a look:
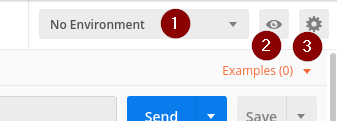
- Environment selector drop-down. It drops down to select an environment.
- Quick-look button, to take a peek at what’s set in your environment
- Manage Environments button, where the real editing happens.
To get started, we’ll want to click the Manage Environments button. That will open a large, but relatively empty dialog, with an Add button at the bottom. Click the Add button.
You will be presented with another dialog. This one looks almost the same as the Collection Variables dialog, except that it takes a name.
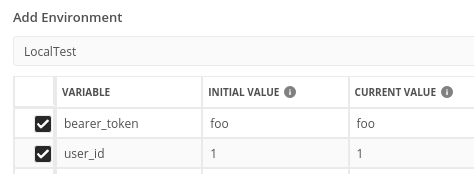
I’ve named mine LocalTest.
I’ve also added two variables, one called bearer_token, with a value of foo. The other called user_id with a value of 1.
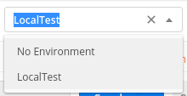
Once I’ve finished editing, I click the Add button near the bottom of the dialog, and then close out of the Manage Environments dialog. There’s one final, important, oft-forgotten step before I can use the variable in this environment. I need to choose it from the Environment selector drop-down.
And now these additional variables are accessible in the same way as the api_host was above: and
Route Parameters
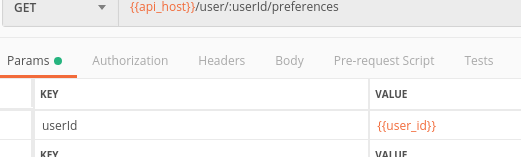
It’s common on modern APIs to use route parameters. Those are values supplied as part of the main path on the URL. For example, consider the following: http://localhost:4000/user/42/preferences
The number 42 in a URL like that is actually a parameter, most likely a user ID in this example. When the server-side application routes the incoming request, it will extract that value and make it readily available to the function or functions that ultimately handle the request and construct the response. This is a route parameter. It may be convenient to make this easily editable or Postman. The syntax for that is simply to put it directly into the URL in the form of a colon (:) followed by the parameter name. For this example request in Postman, I would enter it as /user/:userId/preferences. Then, on the Params tab of the request, I can see it listed and set its value. In the image below, I set it to the user_id variable that I specified in the environment variables earlier.
I could have written my variable directly into the URL as well, but this way is cleaner, in my opinion.
Bearer Tokens
Imagine a scenario where you issue some sort of auth request, it responds with a bearer token, and then you need to use that token in all of your other requests. The manual way to do it would probably be to just issue the auth request, and then copy and paste the token from the response into an environment variable. All the other requests can then use that environment variable.
That will work okay, but it can be a pain if you have a token with a short lifespan. There’s a more elegant solution to this problem. Consider the following response:

We’ve issued our request and received a JSON response containing our token. Now I want to automate the process of updating my environment variable with the new bearer token. On the requests interface, there are several tabs. The one furthest to the right is called Tests. This is mainly for automatically examining the response to determine if the API is broken, like a unit test. But we can abuse it for our purpose with just a couple JavaScript statements.

I add the script above, click Save, and then run my request again. And it appears that everything happened exactly the same as the first time. But if I use the Quick Look button to see my environment variables…

I can see that the Current Value has been updated automatically. That’s the first step – I now have the value stored in a place that I can easily reference, but it doesn’t put that Bearer token on my requests for me. I have two options for that. The first option is that if I got to the request’s Authorization tab, I can set a bearer token from the type drop-down, and point it at my variable.

This approach is alright, but then I need to remember to set it on each request. But the default Authorization Type on each new request is Inherit auth from parent. The parent, in this case, is the Collection. So if I switch this request back to that default type, I can then go into the Edit Collection settings (same context menu as I went to for Collection variables), and go to the Collection’s Authorization tab.
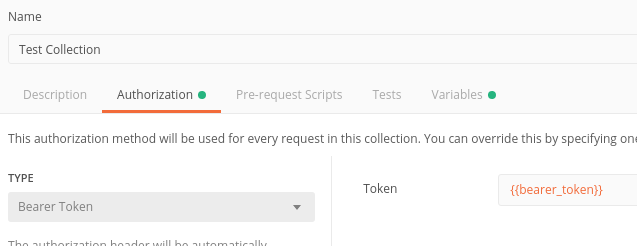
It presents almost the same interface as the Authorization on the request, and I can set it the same way. The difference now is that it’s managed in one place – in the collection. And every new request I create will include that bearer token by default, unless I specifically change the type on that request. For example, my Authentication request likely doesn’t need the bearer token, so I might then set the type to No Auth on that request’s Authorization tab.
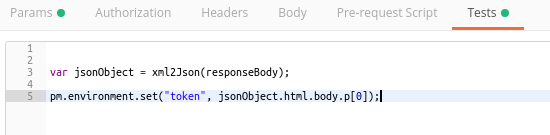
Occasionally, I run into applications where an XML or HTML body is returned containing the value that I want to extract. In those cases, the xml2Json function, which is built-in, is helpful for parsing the response.
As one more note – the is the Pre-request Script tab, which uses the same basic scripting interface. As you might expect, it executes before the request is sent. I know some of my colleagues use it to set the Bearer tokens, which is a totally valid strategy, just not the approach I use. It can also be helpful where you need a nonce, although that’s again not something I typically encounter.
Next Steps
In Part 4, we will wrap up the series by incorporating some Burp Suite extensions to really power-up our penetration testing tool-chain. But this whole series is really dealing with tooling. There is a lot of background knowledge that can be a huge difference-maker for API testing, from a good understanding of OAuth, to token structures like JWT and SAML, to a really good understanding of CORS.