
As of 2019-05-14 the Funny Stories section has been updated.
Now that we understand what the goal is from my first blog post, we can move into the good stuff! The packer build process is pretty much the whole reason I embarked on this journey of automation. I got tired of installing kali from an iso all the time because something screwed up or I did a fresh install during a distro hop. So, I went to vagrant cloud, to try to use someone else’s vagrant box, but every time I found another kali vagrant box (virtualbox vm), it was either out of date or completely broken. Finally, I decided to take a crack at making my own.
In this blog post we will discuss the process of building your own fully updated, customized kali vagrant box automatically (from a Github repo), and then we will talk about how to use that box effectively. In the Github repo I will tell you how to build the box manually, but this post will discuss how you can use my project as more of a framework so you can add your own customizations. I am always open to, and encourage pull requests and issues for anything that could be added to the project. So don’t be afraid to start a dialog with me through Github (i.e. Github issues) or twitter. On the note of projects, I have to give a lot of credit to Chis Long, creator of Detection Labs, and the Bento project by Chef. I used their projects as references quite a lot while creating this project.
Here is a quick preview of the complete automation process that is run by Circle CI, in the continuous delivery pipeline.
Reviewing some basics
I would highly recommend that you checkout the intro’s for the packer and vagrant tools. To better understand continuous deployment. Wikipedia actually has a good definition, and the basics of using git with Github helps us version our code and keep track of issues. Finally, the vps we will be using has a pretty thoroughly documented api, that lets you interact with it right in the browser. But if you don’t want to do that, you can always use Postman (of which one of my co-workers has a good intro here). Getting familiar with these tools will help you understand this process better, so you can further customize this to your own automation needs. Also, I have given this as a presentation before at conferences, and you can view the slides and video(s) in the Github repo. I know that this feels like a lot of upfront work just so you can get this to work for your custom solution, but here are two quick things before we start.
- If you feel overwhelmed with me giving you all this information after I have curated it, imagine how I felt starting out :), and I was able to do it. So if you stick with it, you will be able to set it and not have to think about it again. You are future proofing (for the most part) dealing with this again.
- This is only if you want to customize your own version of this process, but if you want to do this without having to deal with all the setup you can just use my vagrant box. Then, if you want any added features all you have to do is submit an issue requesting it and we can look at getting it added.
Services signup
The following services will be needed to ensure you can use this automation process:
- Baremetal vps (virtual private server) provider (packet)
- You need a baremetal vps because packer requires a hypervisor (i.e. virtualbox in this situation) to build the image with.
- CD (continuous deployment) pipeline (circle ci)
- Github Join
- Vagrant Cloud
- Textbelt (optional)
- I use this to text my google voice number when a job is queuing up. Since this is optional, and I already have a lot of content, I won’t cover this in depth. All you have to do is set the environmental variables PERSONAL_NUM and TEXTBELT_KEY in CircleCi.
Automation base
To show you part of what the packer process will look like, I recorded a video so you can see what will happen in the background when you kick off this build process.
Packer deep dive
Here is a breakdown of the general process seen in the video:
- Packer downloads the iso you point it to
- It then spins up a http server so the vm can retrieve the files it needs to.
- Starts a vbox (virtualbox) vm
- Enters the boot sequence so the vm retrieves the prefetch file (will explain later)
- Does the base os install
- SSHes into the vm and runs the provisioning scripts
- Exports a vagrant box from the provisioned vbox vm
- Uploads that to vagrant cloud
To help with the automation process, in my Github repo, I created a bash script (and plan to do a powershell script down the road) that finds the url for the most up-to-date, stable iso that offensive security (offsec) publishes, and pulls down the SHA256 sum, with the signature, to ensure that the iso and checksum have not been tampered with. I have also provided a Vagrantfile that you can use to run the bash script, if you don’t have a linux system, or if you wanted to do any development on the project. It will have all the dependencies you need and be as close of a replica to the CI server. You will have to run the bash script to generate a variables.json file, which will have, at minimum the url, shasum, and output vagrant box name, you should be able to start the packer build process.
The next file that is utilized in this process is the preseed file, and this was the most difficult part for me… I will refer you to debian’s website to find out what the definition of a preseed file is. I went to offsec’s Github repo, which is supposed to be the preseed files for kali. When I tried to use their preseed file, to answer the questions during the pxe boot process, it did answer quite a few questions. Trying to identify what other options the install needed took me forever! I was able to figure out what else I needed from googling around, also using the bento project as a reference for some enhancements. Once you have figured out all the particulars for your preseed file (or use mine), your operating system will install as the base OS. Next, in the provisioning step, I used some code from the bento project’s debian folder and added kali specific parts, as well as my own customizations. Then, after the provisioning comes the post provisioning. This is when packer creates a vagrant box and will upload it to vagrant cloud, so you can download it when possible. Compression will help with upload and download speeds from vagrant cloud. I have set it to the max compression, but choose what you feel is appropriate.
Continuously deploying packer
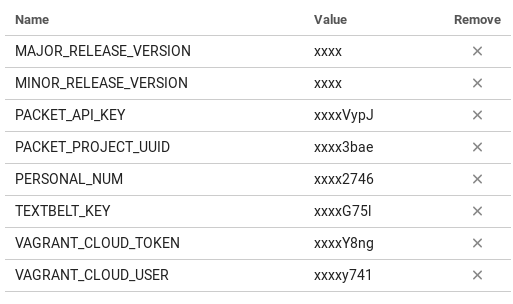
After understanding the workflow for packer I can now discuss automating this process. I mentioned at the beginning of this post, that I included CircleCI and a vps to help me automate. However, there are a few things you have to setup before being able to completely automate this process. The first thing I would do is setup your environment variables inside of CircleCI. You can follow this guide on accessing project settings. After you get to that console, you can go to the Environment Variables section and add the following key value pairs. The key being the name listed below and the value being your actual value (i.e. your vagrant token for vagrant cloud will be put into the VAGRANT_CLOUD_TOKEN value).

This is important because all of these environment variables (except for TEXTBELT_KEY and PERSONAL_NUM, those are optional) are used in the packer build process, and if it isn’t included then the build process won’t act as expected (i.e. you probably won’t get your automated build). The major and minor release version variables are used for versioning your vagrant box image in vagrant cloud. The packet api key needs to be created from your general account not the api key tied to a project. You can generate this api key at this location on their web application. (shown below)

Then, the vagrant information is pretty self explanatory, since there is only one way to do anything in vagrant cloud. The only thing that isn’t intuitive is that you have to create a “New Vagrant Box” that has the name you want for your kali image. By default it will be ${your_vagrant_cloud_username}/kali-linux_amd64, on vagrant cloud (i.e. here is mine elrey741/kali-linux_amd64).
After ensuring all this information is filled out in the environment variables, you will be able to finally kick off a build. After adding the project into CircleCI as a project to follow, you can start a CircleCI build. Simply, by making any change in the repo and pushing that change to Github. A few hours later you will have a fully built kali vagrant box that you can pull down from vagrant cloud. Once you have ensured that you successfully built the kali image from the build you manually started, you can then alter the .circleci/config.yaml file to whatever scheduled build you would like. Here is a guide from CircleCI on how you can do this.
Vagrant effectiveness
Once we have a fully customized and updated kali image up in vagrant cloud, let’s go ahead and assume we have pulled down the vagrant box (it tells you how in the vagrant cloud) and are getting ready to use it. First thing we have to do is realize what the vagrant ecosystem is all about. We can do this by looking at Hashicorp’s operator use case.
We will be using vagrant as an ephemeral pentest machine. Essentially, we will do a pentest and then destroy the vm afterwards. This affords us a few amazing features. First, it ensures that there is no client data still sitting on our vm after our pentest. Second, it allows us to have a fresh instance every time, so there won’t be any configurations left over that could possibly mess up results (i.e. a static route that we had to set for scanning). Third we can make scripts that will setup our environment exactly how we want every time. This ensures we are 100% satisfied and also know that our vm is exactly how it should be. Fourth, this process publicises your whole build process. It shows everything! When you dynamically get the url, that you are downloading the iso from. All the way to the complete build log, created by packer, of what you installed during the installation process. Lastly, you can keep working with your current kali instance, while the new and updated one downloads in the background. This allows you to only have downtime except when destroying and importing your kali vm, which you would have to do either way when you wanted a fresh setup (i.e. vagrant destroy and vagrant up.
Next level automation
Finally! I know that was a lot, but we now understand how to have a pentesting vm where we don’t have to continuously manage the updates and customizations, and the vm updates on a cron schedule!
So what’s next? Well, how about automating our homelab setup? Our C2 instances? We can automate all the things! Here are some current projects you can use as resources that will help with additional automation. We will get into that next time using terraform. More automation coming up!
Ephemeral c2 automation: https://github.com/rmikehodges/hideNsneak
Blog about red team infrastructure wiki: https://rastamouse.me/2017/08/automated-red-team-infrastructure-deployment-with-terraform—part-1/
Detection Lab: https://github.com/clong/DetectionLab/
Extra info
Warnings and acknowledgements
I ran into a few things that I wanted to inform people about, because they aren’t always things people naturally know. First off, be careful with your environment variables! If you look at the beginning, where I first started using CircleCI, I printed out an old (currently revoked) vagrant cloud token, just to ensure it was getting passed properly. However, one of the more recent things that I found was that when you have packer in debug mode, it outputs your vagrant cloud token as well…So when I started uploading the debug log into the artifacts section of the build, I found out the artifacts section is viewable by the public. So I had to revoke my vagrant cloud token again, and put a request in for them to add a flag in your CircleCi yml config to allow you to mark specific artifacts as private. You can find that here, and if you would like this feature as well please go vote for the idea so they implement it. So yes, I know that in my Circle Ci builds I disclosed a few of my vagrant cloud api tokens. They have since been revoked and replaced.
Also, I really wanted to reiterate how grateful I am to the bento project and Chris Long (Detection Labs), for how much work they put into their projects. I am only able to say I have completed my automation project because I had theirs to use as a guide. I know I could have tried to find out everything by myself, but that would have taken a lot longer and would have been more difficult. I actually reached out to one of the developers that is on the bento project, from chef, and he was really responsive and very amenable in sharing what they had done with their ecosystem of building images. (Which was really awesome to hear about, because they have a really amazing setup!) I also have been recently messaging Chris Long on twitter and he is really responsive as well. So if you ever have any questions about their projects, they are super approachable and really cool to talk to. Thank you so much for everything these projects have committed to specifically my project and the community as a whole!
Funny stories
While doing this automation process, there were a couple nuances that I found… normally if you were manually executing these tasks, they probably wouldn’t have been apparent to you.
I found the first one because I created my script for finding kali Linux’s iso, shasum, and signature. I found out that sometimes iso hosting mirrors get out of sync with the master server (or whatever the master node is supposed to be called). I found this out because for a day or so I was trying to debug my script thinking “What changed” (since the day before it worked, and I hadn’t changed anything). Then, I found that whatever mirror I was hitting had a previous version of kali’s iso and I was pulling the current shasum and signature. So when validating the integrity it would error out. After contacting the offsec support, they told me that the mirror was probably out of sync, and sure enough, a few days later it was fine. If I wasn’t trying to validate the integrity of the iso though (which, if you are installing kali a lot you eventually skip, because it gets cumbersome), then I wouldn’t have ever noticed that.
My second strange encounter was actually this past weekend. I noticed that my build was failing on CircleCI, and I thought…that is strange…apparently there was some type of weird cert change that Oracle was doing with the virtualbox servers that wasn’t matching the hostname. So, I was getting an invalid cert warning (see image below). You can checkout the full build here.

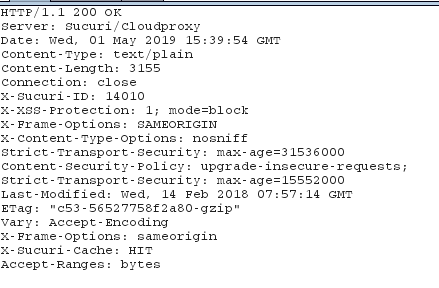
This last quirk I found on Wednesday of the week, while trying to publish this blog post. I ran into a situation where I was trying to curl kali Linux’s .asc key (to validate shasums), and when I was curl’ing I was getting binary output! I tried to debug what was happening, so I went to proxy my traffic through Burp Suite. Then I didn’t get any binary output…I was extremely confused. I checked the headers that was returned with the response I received from their server, and I saw that the traffic was hitting a WAF (picture below of the headers). So, completely speculation, what might have happened is that the WAF company pulled a new batch of signatures for “malicious” traffic (since it was the beginning of the month), and curl version headers were in that batch. You can look at all the other associated pictures, with binary output and everything, in my bugs ticket with kali here (I did the wayback machine for the link, so I knew it wouldn’t get deleted).
Again, just some funny/weird encounters that I ran into along the way 🙂
2019-05-07
Since I had already put all my other funny stories here, I figured I would make this a running log of all the incidents that I run into since I started using this to automate things. So I won’t put the details here, but I will continue to link to individual issues that I will open on github and subsequently close (when I notice it is fixed by x vendor/thing (being very vague because lots of things can go wrong)). You can search my repo for all the bugs by going to this link: https://github.com/elreydetoda/packer-kali_linux/issues?q=is%3Aopen+is%3Aissue+label%3Aothers
bug that happened today: https://github.com/elreydetoda/packer-kali_linux/issues/13